Welcome back to my second beginner blog post on how to research your personal genealogy tree for free!.
In this post, I will show you how I like to research records that are on FamilySearch using just your free FamilySearch account.
In my previous blog post, “How To: Research Your Personal Genealogy Tree For Free!”, I went step by step on how to find FamilySearch on the web, how to change the preferred language and create a free FamilySearch account.
After creating your account, you will receive the “Thank You page” with four boxes to click on after signing in.
- Family Tree
- Free Records
- Memories
- Indexing

At Your Home Page
After signing in, you will be taken to your home page. Your home page will be specific to you and you can take your time to explore all of what FamilySearch has to offer.
One note about building a tree on FamilySearch is that you do not have control of your family tree. One minute you may have the correct people for, in example, your grandparents, but the next time you visit, another person has put somebody else to replace one of them.
FamilySearch’s goal is to build one world family tree.
I found FamilySearch after I started my tree on Ancestry® . Since I had an established tree, I was not interested in building another tree because back then FamilySearch did not allow GEDCOM uploads.
(GEDCOM is an acronym standing for Genealogical Data Communication. It is a universal genealogy file that allows you to exchange genealogy software programs)
Since then, FamilySearch updated their system, changing this, so I made a GEDCOM from my Ancestry® tree and uploaded it onto FamilySearch, albeit with the mistake of uploading my entire tree of over 25,000 people at once.
With the file so large, FamilySearch wants me to make all these comparisons on my ancestors before I can add them directly to me and frankly, I do not want to spend hours on something that complicated.
Hopefully, this process will change too, so I will wait and see.
Now, you can choose to create your own tree for free on FamilySearch, but I personally love having my own tree where I do not have to worry about people changing my information overnight.
My advice, do what seems right for you.
However, regardless of which one you do, I recommend learning how to at least do the research for free via FamilySearch. That’s what I do myself for many of my own mysteries.
Now, my focus in this blog post is show how I research using the “Search: Records; Search by Place”
Search Button and Drop-Down Menu:
After signing in, my typical routine is to click on the “Search” button.
- The image below shows you what your home page will look like and the arrow is pointing to the search button.

- When you click on the “Search” button, a drop-down menu will appear.
- My top 4 main search areas are:
- Records (This post focuses on this method)
- Catalog
- Books
- Research Wiki
- Click “Records” in the drop-down menu.

3 Ways to Search For Records
Now you will see 3 ways to search for your ancestors:
- By Person
- Find a Collection
- Search by place
Before I go into more detail about my favorite, “Search by place”, I highly recommend looking over their link: Tips For Effective Searches
This link is also found on the FamilySearch: Search Record pages, which I circled on the image below.
It gives you great strategies/tips for how to get the desired search results for your ancestors.

My Favorite: Search by Place:
You are probably wondering why “Search by Place” is my favorite.
Usually for me, I want to focus on records about the place where my ancestor was located.
(When they say place, think state, province or region in terms of size. They aren’t asking for a city or address)
By going to the country and, if in the United States, by state, I have the perfect one-stop search for my ancestor.
- One way to start is to enter the place in the box for exact place. If in the United States, I would enter a state.
- Alternatively, my preferred method is to click on the blue link “Browse Places” (This way has no typing involved)
- Immediately you are taken to a world map.
- Then, click on an area for desired location search.
- In my example, I clicked on England.
- Off to the right I narrow my search even further.
- I clicked on England again.

This is why I call this the One-stop search.
(As a side note, while you are here, you can also:
- Do course learning
- Go to FamilySearch Wiki for your preferred place
- See the current indexing projects where you can volunteer a small amount of your time
- Then do your search using just the England records
- The indexed records are thanks to all the volunteers that helped with the indexing project
- There are 97 indexed collection records for England
- Off to the right of the collection tells you how many records are in the collection and when it was last updated
If you are curious about any of these, they can and, one day, will be a blog post in themselves
For the main topic, however, continue to the next block)

3 Levels to Search In Your Chosen Place:
At your desired location, you have 3 levels to search:
- Broad
- Selective
- Narrow
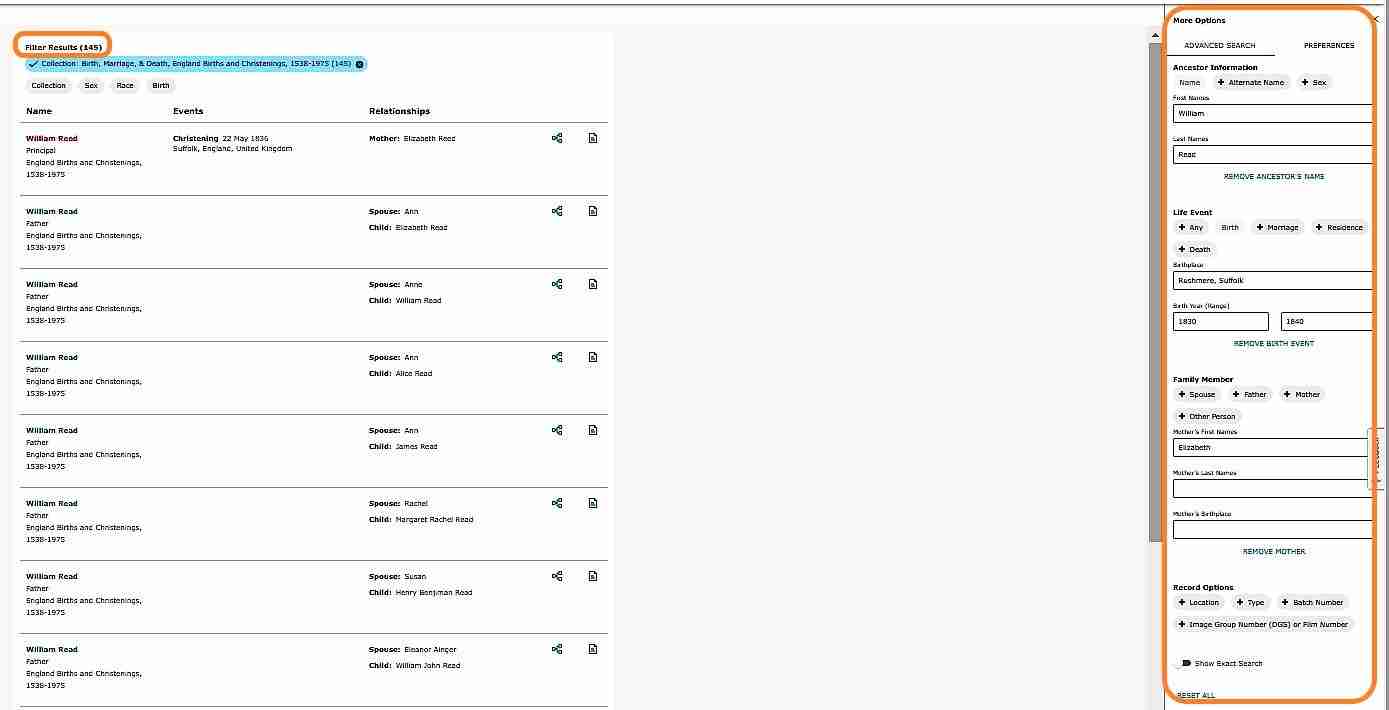
With the broad index search (circled in orange in the image), you are searching every collection for the place that might have been indexed against your ancestor.
In my selection for England there are 97 index collections.
If you don’t click any other options to restrict the search (Circled in green in the photo), then it will search through the 97 indexed collections for my ancestor.

The next search is selective search. This is where you put a checkmark or tick in the box for each of the individual collections you want to search.
Also, the information is still in the upper search boxes as shown in the image I have filled in.
Click Search to get those results.

The last search is clicking on an individual collection link and doing a search only on one collection.
When I clicked on the “England Births and Christenings 1538-1975“, it took me to the web page to the right.
At this page, it gives you a description about this individual collection and how you can search just this index collection.


Results:
With any or all these search methods you might have been given good results and you are a happy camper.
In my example below, I have 145 results, which if you scroll to the bottom of the page, you can change how many results you can see on a page. I like to see 100 results on the page.
If I do not see my result, then to the right are more options you can try.
With manipulating the options around with variations or combinations for names, dates, birth years, etc. you can often get the results you are looking for on your ancestor.
Wrap-up:
In this beginner blog about how to use the FamilySearch website to search for free records for your personal genealogy tree, you now should be able to:
- Sign In to FamilySearch
- Go to “Search” tab and click on “Records”
- Choose how you want to search
- Individual
- Collection
- Place
- On “Place”, the one-stop-search you learned about:
- Learning courses
- FamilySearch Wiki
- Indexing
- Broad, selective and narrow searches
In my next blog, we will continue from where I left off as I believe in keeping the post short with the exact information you need.
If you like my blog, please share it with the social media icons at the bottom of this page.
I love to hear from my readers and I especially love questions or genealogy mysteries that you need help with.
I encourage you to leave a comment below or you can privately email by clicking this contact link or clicking contact in top or bottom menus.
Nancy Dru loves to help with your genealogy mysteries!